Neck Pillow: Cutting Fabric with a Cricut Maker 3
A neck pillow shaped like a dog bone works great for reading, traveling or any time you need extra support for your neck. It's a simple project that doesn't take long, but it sure can make you more comfortable.
This neck pillow can be used at home, in the office, on vacation, for sleeping or relaxing or for overnight travel. Customize your pillow with your team logo, name, monogram, favorite phrase or design for any long journey.

I saw one of these on Pinterest and immediately wanted one. There are lots of patterns out there, but I found this one by Liberty at B4 and Afters. She not only includes a pattern to cut by hand but also a link to the project in Design Space, so you can cut the fabric pieces out with your Cricut, and it's all free! There are written directions or a video to watch. It could not be easier to follow.
Here is a link to find the project on her site, if you wish - B4 and Afters Neck Bone Pillow.
Materials:
Cricut Maker 3 or Maker machine
Cricut Rotary Blade
Fabric Cutting Mat - 24x12 inches
Cricut Brayer
Fabric
Rotary mat and cutter (optional)
Scissors
Polyester fiberfill
Needle and thread
Sewing pins
I've been wanting to try cutting fabric on my Maker 3, and I already had the fabric cutting mat, so this seemed like a great opportunity to do so. I have cut felt on it previously, but that was quite a while ago.

All I had to do was click on the link provided, and it took me right to Design Space for a ready-made project. I just needed to prepare my materials and then click "Make It" when I was ready to start cutting.
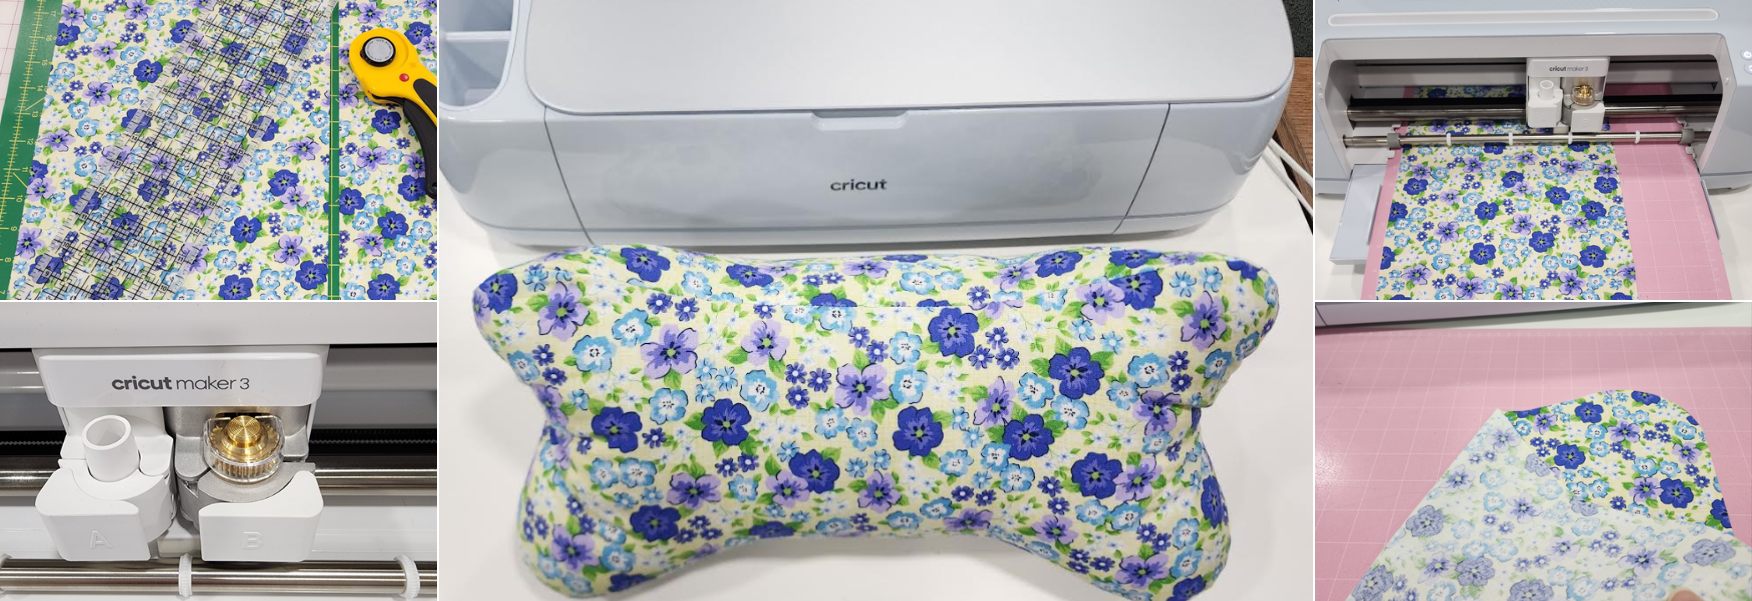
To prepare, I needed three pieces of fabric to go on the cutting mat. My fabric was almost 25 inches wide - more than half a yard. I knew that would be enough.

Design Space showed the pattern piece would be almost 9 inches by 17 inches. This would require a 24-inch fabric cutting mat, and I would have to cut each piece out separately.

I always allow a bit of extra room around the design, so I cut the fabric rectangles 9.25 inches x 17.5 inches. I used my rotary cutter and mat for this, but a scissors would work just as well.

Now I was ready to cut out the pattern pieces with my Cricut. I laid the first piece of fabric onto my fabric cutting mat and smoothed it out with my hands. Then I went over it with a brayer to make sure it was adhered well.

Design Space instructed me to insert a rotary blade in Clamp B, where the fine point blade usually goes.

I removed my fine point blade and placed the rotary blade in its place, shutting the clamp to secure it. Then I was ready to go!

I loaded the cutting mat in the machine and hit Go, and the machine pulled the mat through to measure for the correct length.

Then it started cutting the fabric. Whenever the blade came near a corner, it would stop, pull up, rotate, go back down and then continue cutting. When it was done, I unloaded the mat from the Maker 3. I could hardly see the cut lines in the fabric. At first I wondered if it even worked.

But I pulled away the extra fabric and saw that the Cricut cut the pieces perfectly.

After that, I pulled the fabric pattern piece off the mat. It peeled off so easily and was perfectly shaped. I was so pleased with the result.

Now I just had to repeat the cut twice more to end up with three pieces to sew together.

Once that was done, I was ready to sew. I won't add a lot of detail here. I mainly wanted to show how awesome it is to cut fabric pattern pieces with the Cricut, but I will also show how the final product turned out.
I sewed the three sides together as instructed by Liberty, leaving an opening to stuff the pillow.

It took all of a 12-ounce bag of polyester fiberfill to stuff my neck pillow, maybe even a bit more than that. I packed it in there tightly because I wanted the pillow to be quite firm.

The opening for the stuffing then had to be stitched closed by hand. I pinned the edges together before starting.

Here it is all stitched together. I learned how to hide the tail of the thread inside after knotting it at the end. A link to an additional video showing how to do that was included with the tutorial I was following. How did I not know about this after sewing for so many years? Dang.

Now my neck bone pillow was done! I look forward to using it the next time I do some reading. I placed it in front of my Maker 3, so you can see the size of it. It's bigger than it looked in the tutorial but just the right size, I think.

To be honest, I've been sewing for so many years that it seemed faster to cut out the fabric by hand. However, for sewing projects with lots of small pattern pieces, this would save a lot of time, and you can't beat the precise cuts made by the Cricut.
I will definitely use this method in the future, especially with digital patterns that are easily uploaded into Design Space. I was pleased that the fabric did not leave any residue behind on the mat. It probably depends on the type of fabric used. This project was made with woven cotton.
Do you need one of these neck pillows in your life? It doesn't take long to make, and you don't even have to cut out the pieces by hand, if you'd rather not. This would also make a great gift.
Update: I found that my neck pillow was too firm for me. There was no "give" to it, and it pushed my head forward a bit too much. For the next one, I won't stuff it as firmly and see if it fits me better. Otherwise, I could reduce the pattern size in Design Space before cutting out the fabric.
You can't go back and change the beginning, but you can start where you are and change the ending. C.S. Lewis
Leslie
How to Cut Fabric with Cricut || Personalized Pet Bandana
Cricut Beginner Project - Felt Graduation Banner
All About the Blades: Cricut Maker Rotary Blade Note: The Rotary Blade does not come with the Maker 3 machine, but you can purchase it separately if you don't have one.
FEATURED SALES